


Production Timeline Guide Plan a Campaign Without Rush Fees
This production timeline guide helps you plan a campaign without rush fees and last minute stress.
Last minute orders happen. However, rush fees and stress are usually avoidable with a simple plan.
If you’re ordering custom branded kitchen tools, boards, or gift sets for an event, a client push, or employee recognition, timing matters just as much as the product. The earlier you plan, the more options you have, and the smoother the process feels.
This production timeline guide will help you map your campaign from idea to delivery with fewer surprises.
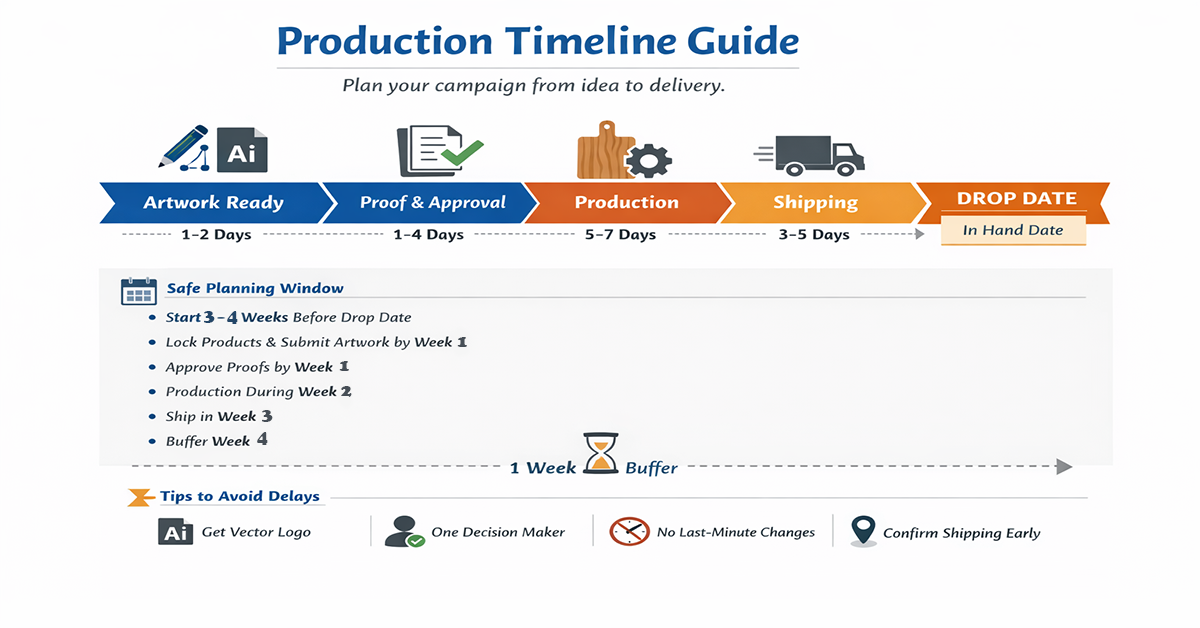
Start with your drop date and work backward
First, pick the day the items must be in hand. Then build buffer.
A safe rule is to plan backward in blocks
-
Artwork and proof approval time
-
Production time
-
Shipping time
-
Buffer for unexpected changes
Even if everything goes perfectly, having buffer keeps you out of rush territory.
The biggest delay is often artwork and approvals
Most campaigns do not get delayed in production. They get delayed before production even starts.
Common slow points include
-
No vector logo available
-
Too many decision makers on the approval
-
New artwork requests mid-stream
-
Late replies to proof emails
To avoid that, decide who owns approval and collect artwork early.
Use this production timeline guide to build your schedule before you pick products or finalize quantities.
A realistic timeline you can follow
These windows keep most campaigns on track.
Step 1 Artwork ready and submitted
Plan 1 to 2 business days
Get the logo file, confirm brand color needs, and choose the product and branding method.
Step 2 Proof and approval
Plan 1 to 4 business days
Proof turnaround is often quick, but approvals can take longer. Also, every revision adds time, so keep feedback clear and consolidated.
Step 3 Production
Plan 5 to 7 business days for first-time orders
Plan about 5 business days for repeat orders using the same artwork
New artwork can extend this, so reorders move faster when art stays consistent.
Step 4 Shipping
Plan 3 to 5 business days in transit
Some destinations can take longer, so plan for a full week when you can.
A simple no-rush schedule
If you want to avoid rush fees, aim to start earlier than you think.
Here is a safe planning window for most campaigns
-
Start 3 to 4 weeks before your drop date
-
Lock product choice and branding method by week 1
-
Submit artwork and request proofs by week 1
-
Approve proofs by week 1
-
Run production during weeks 2
-
Ship in week 3
-
Keep week 1 as buffer
For large events, multiple locations, or gift sets with several components, add another week.
How to speed things up without rushing production
If your timeline is tight, focus on the controllables.
-
Send Vector Artwork Up Front
-
Choose One Internal Approver
-
Avoid Mid-Process Product Changes
-
Confirm Shipping Address Early
-
Reuse Existing Artwork When Possible
Even small decisions early can save days later.
What to send your vendor on day one
To keep momentum, send these details together.
-
Product Selection
-
Quantity And In Hand Date
-
Logo Files And Brand Notes
-
Decoration Preference
-
Shipping Address And Any Deadline Notes
When everything arrives at once, proofs move faster and production can start sooner.
Want a quick timeline check before you launch
If you tell us your drop date, product idea, and quantity, we can suggest a timeline that helps you avoid rush fees. You can also send your logo and we will flag any artwork issues early so you do not lose days later.
Back to Blog Home